Tuesday, August 21, 2012

Mystery Mushroom Solved!


Well, I finally found out how my mystery mushroom came to be.

I hosted a private studio tour for the students of the McGroarty Arts Center about 2 months ago and the organizer of the tour, Michelle, left her gift for me as a token of appreciation when she came to the house.  She actually made the mushroom during the paper clay workshop I conducted over there, and I recalled seeing her working on it.

So, now, I can sleep at night knowing the souce of this adorable mushroom. It certainly was well hidden in my garden or  I have to be more observant of things popping up. Maybe, I just have to do more yard work !!

Thanks, Michelle.

Thursday, August 9, 2012

Mystery Mushroom

This week I found a ceramic mushroom underneath the Japanese Black Pine in my front garden.

I have no idea who left it there or how long it has been there. What's more interesting was that it was made by some one, glazed and high fired. Did that someone knew I do ceramics? Was it one of my neighbors' kids?

It was actually quite well made and rather large for a mushroom.  On the bottom, it had some glazing notation. Iron Oxide was used for the gill area of the cap and for the spots on top of the cap. The "CuR", I believe stands for Copper Red.

I thought I'd post it here since it is ceramic related. To whoever gave his/her mushroom a new home in my garden, a very big and happy "Thank You" to you!

Maybe I'll make some more mushrooms to keep this one company!


Thursday, August 2, 2012

Steel, steel and more steel

My latest piece, "You Never Forget Your First Love."

Completed just a few days ago. The original concept, design sketches, and idea are several years old. I started work on the pod this year and was finally able to put everything together.

The pod is Gault 10 paper clay. This is my standard paper clay for my sculpture pieces. Fired to Cone 10 reduction with Van Gilders flashing slip and black iron oxide stain. I enhanced the surface with an acrylic pearlescent wash. The studio lights really bring out the shine in this treatment. The heart inside the box is finished with a hand rubbed copper leaf paint.

When you have a piece like this, the question is how to mount and display the work.

The support rod is 3/8" dia. stainless steel and the base is a really heavy, high carbon steel plate. The base has to be heavy enough to support this pod which about 32 inches high. My friend, James, who's a machinist, supplied me with these scrap steel pieces.

The barbed wire is from my family's house in Penang. It was put up by my dad way back in the 70's in our garden as fencing. It has weathered into a texture and color I really like and I used up all the barbed wire I brought back. I think it was almost 40 feet of it, if not more.

To me, ceramics blends itself very nicely with other materials and I use them to make the piece and tell the story.

41"H x 11" W  x 11"D

Tuesday, July 31, 2012

Back To The Drawing Board

In this case, it's back to the slab roller, so to speak.

This was the result of my planter after Cone 10 reduction fire. It collapsed and "ate" two other pieces in the kiln. Sorry!

I wrote an earlier post about needing a new planter for my succulents which are overgrowing the current planter they are in. I decided to use some left over paper clay mixed with coffee grinds. The concept was good but the kiln gods and Cone 10 temperatures taught me a thing or two.

When everything turns out well after a firing, we seldom give it much thought. More often than not, it's a sigh of relief that the piece turned out well and came close to expectations.

I learn a lot when a piece does not survive a high fire. I begin to ask why it did not work and sometimes the answers stare back at me like, "Yea, you should have known about this all along." I learn more from my mistakes than my successes.

So, why did it fail?

Not a person to waste my coffee grinds, I used too much and the strength of the form where it contacted the base was compromised. At Cone 10 temperatures, it did not have enough vitrified clay left to hold its shape and hence, the slump. Moreover, the edges of the planter were rather thick so there is the weight factor.

When I redo this piece (because my succulents really need a new home), these lessons will come in handy for a successful second attempt.

Monday, July 30, 2012

Finished

Fired to Cone 10 reduction with no glazes. The buff color is the natural color of the Gault 10 paper clay. The twinges of oranges are from the reduction environment in the kiln.

I wanted to see how this experimental piece comes out in its natural state.

See my earlier blog entry on the start of this piece.


Sunday, July 29, 2012

No Right Or Wrong Way, 2012


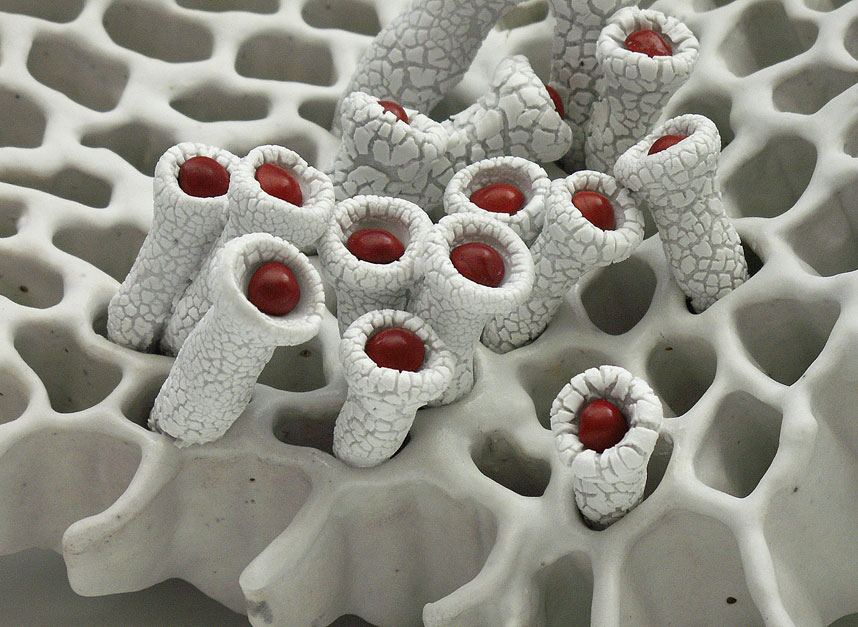
Hand built and dipped paper clay. The honey comb structure was from paper packaging and dipped in Gault 10 paper clay slip until the desired thickness was achieved. The final few coats were dipped in Southern Ice Porcelain paper clay because I wanted a whiter look. The same thing was done with the pods. In addition, I dipped the pods in a beaded white glaze while the paper clay was still bone dry. The pods were then assembled onto the honey comb base.

Close up of pods and the beaded white glaze
In placing the pods, the title of the piece came to me. There is really no right or wrong way for the pods to "grow" out of the base, hence the title.

The entire assembled piece then went through the bisque fire and to Cone 10 reduction. There was some movement of the pods during the final fire but that was OK. The beaded white glaze turned out really nice. I got small beaded crackles on the pods.

This piece is essentially a white on white piece except for the pops of red from the natural seeds in the cup of the pods.

This piece started out as an experiment to see what would happen if I used different materials coated with paper clay. I liked the direction of the piece and continued with it. It survived the firings with no problems and no cracking.

Approx. 12"W x 8"D x 5"H


Monday, July 16, 2012

ALL MEDIA 2012 Juried Exhibition at the Irvine Fine Arts Center

Anthony Foo is pleased to present his ceramic sculpture, CHRYSALIS, at this year’s ALL MEDIA 2012. This juried exhibition runs from July 28h thru August 25th, 2012 at the Irvine Fine Arts Center, 14321 Yale Ave., Irvine, CA 92604. Phone: (949) 552-2137.

Opening reception is on Saturday, July 28th from 5:00PM to 8:00PM. Admission is FREE.

Anthony Foo is an Orange County ceramic artist who has exhibited at the American Museum of Ceramic Art (AMOCA), Kellogg Art Gallery – Cal Poly Pomona, California State University Fullerton (CSUF) Grand Central Art Center, The McGroarty Art Center in Tujunga, and the Irvine Fine Arts Center, Irvine, California.

CHRYSALIS (http://anthonyfoo.com/Chrysalis.htm) is a continuation of my pod series of paperclay sculptures,” says Anthony. "Nature and natural forms are dominant in my one-of-a-kind sculptural works.

“This piece explores the genesis of life, as it transforms from one form to another. The outer “cage” protects the inside and creates a safe sanctuary for the inner being to develop.”

“The interior pod is raku fired, the outer is high fired to Cone 10 reduction in two separate halves and then assembled. The work is mounted with a stainless steel rod into a machined and textured solid aluminum block.”

To arrange an interview with the artist, please call (714) 528-9304, or send an email to info@anthonyfoo.com, or visit the website at www.anthonyfoo.com.