Showing posts with label paper clay. Show all posts

Friday, June 29, 2012

Private Studio/Gallery Tour, June 16, 2012.


Installation of my "Mindfield" sculpture at my home for a private studio/gallery tour for the students from the McGroarty Fine Arts Center, Tujunga, California.

I taught a paper clay workshop there a month earlier and thought the students would get inspired coming to my studio and seeing how I work. The entire house was set up as a gallery.

Spiked spheres are approx. 12" dia. Hand build paper clay. Each one of the "spikes" was hand made. I lost count how many were made and I promised myself, "never again!"

I originally wanted to have the spikes randomly placed on the sphere but they eventually ended up in an organized, geometric pattern. That was when I discovered the geometry involved and the beauty in these things that Nature creates so effortlessly.

For this private studio/gallery tour, this grouping was installed in a room with over head track lighting. I like the way the shadows overlapped on the wooden floor.

Electric fired to Cone 06 with low fire red glaze. Mounted with stainless steel rods onto sand blasted solid aluminum bases. The tops can sway but no way are they gonna tip over!


Tuesday, May 15, 2012

2 Views of Summer, 2012


Front and back views of my white Summer Grasses raku vase with bamboo handle. Hand built sculpture clay and paper clay. Grass orchid design is free hand wax resist. White crackle raku glaze. Bamboo is from recycled and repurposed old kendo shinai. Bound with waxed linen twine. 21"H x 8"W x 4.5"D.

I like the simplicity of the design. Doing the free hand wax resist is a one shot deal and I'm happy with the way the grass orchids turn out. The wax resist brushwork is done with a calligraphy brush.

It is more of a sculptural piece rather than an utilitarian one.

Summer Grasses Raku Vase Series


This is a continuation of my Summer Grasses series of raku vases.

Hand built sculpture clay and paper clay. The grass orchid design is free hand wax resist. Different colored raku glazes were used. I experimented with a unique finishing technique for the one on the left.

Each vase is approx 13"H x 6.5"W x 4.5"D. They are ready for my bamboo handles.

Monday, April 30, 2012

Structural Support Considerations


Whenever I build my pod shaped vessels, I have to think about how to fire them in the kiln for bisque fire and at higher cones, for example at cone 5 or cone 10.

In this piece, I wanted to use the Van Gilden’s flashing slip which cracks really nicely at Cone 10 so I had to design a structural support system that will be strong enough to survive a Cone 10 fire.

The donut ring and supporting tubes were all assembled from bone dry paper clay pieces using dry to dry techniques (top picture).  


As my pod is rather heavy and tall (36” high), my support has to be well constructed to withstand any movement in the kiln during firing. The legs were thick slabs rolled into tubes.


Lateral struts at the bottom were added to give sideways rigidity.


This is structural support for my pod which can be seen in the background. The Van Gilden's flashing slip has been applied to it. It's bone dry and it's ready for bisque firing.


 In a way, the structural support is like a piece of sculpture in itself. I plan to reuse this support for future works.


Tuesday, April 10, 2012

I Need A New Planter


Like all growing things, my succulents have started to outgrow the planter I made for them some years ago.

In my old planter which I made out of scraps of salvaged regular clay from the fine arts center, I had to make drainage holes at the bottom of the bowl. This time I decided to try something new. Instead of having to drill drainage holes in the leather hard clay, I incorporated coarse coffee grinds in my paper clay to make the bottom. I then build up the sides with paper clay to complete the planter.

In the bisque fire, the coffee grinds will burn out creating naturally occuring drainage holes, kind of like a colander. I made a base for the planter to raise it above the ground.
This was a quick and rough piece since I wanted to use it in my patio. It is also an experimental piece.

I plan to glaze the sides and base but not the bottom as the glaze will clog up the “coffee-holes.”  I’ll post again once I have this piece finished.

Sunday, March 25, 2012

Oh ...We take this so much for granted

Water is essential in ceramics. Indeed, clay is weathered down rock by water erosion and deposited over million of years. When we are in a ceramics studio, we do all our washing and cleaning up at the sink without giving too much thought to that valuable resource – water. And we use a lot of it.

In my studio, I don’t have a sink so I do my washings in 5 gal buckets. I reuse these plastic containers and ask my friends to donate if they have them. I’ve even been known to dumpster dive when I see a container or two that has been thrown out.

Rain comes only infrequently in Southern California but when it does I put out my buckets to collect the run off from my patio. I use the water to clean my studio, my hands, clay tools, etc. Extra water is used to water the plants and yard. When you don’t have a sink, it makes you conserve the amount of water you use and forces me to reuse the water until it becomes too muddy for clean up.


When that happens, I set the clay water in the bucket aside. The heavier clay will settle to the bottom and the clearer top water is used to water the grass. The heavier sludge at the bottom is left out in the sun to dry out. It takes several weeks for this to happen. The dried out “cake of clay” at the bottom of the bucket will pop off rather easily and can be disposed of in the trash. This way, you keep the clay out of the sewers and your drain pipes.

The top picture shows the rain run off collecting in the 5 gal. buckets during the rains we had yesterday. The bottom picture shows my wash buckets.

Saturday, February 25, 2012

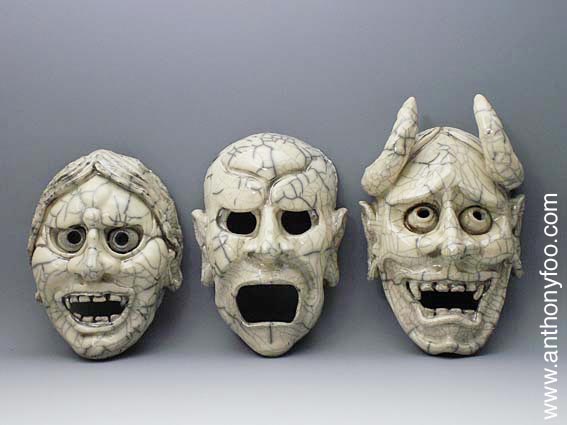
Even Scarier After Raku!

My new set of 3 Japanese themed demon masks. This was how they turned out after today's raku firing, Cone 06.

I used a clear crackle glaze on all three pieces. Some areas have more crackling than others. The darkening around the eyes make them look even scarier. I decided not to clean them up too much.

They should scare away evil spirits, maybe, even unwanted solicitors from your house. I don't think I want to meet any of them in a dark alley!

Friday, February 17, 2012

Southern Ice Porcelain clay in the USA

I came across the paper clay version of this clay several years ago at the Laguna Clay Company in Los Angeles. Since then, they have stopped carrying this imported clay which hails from Australia.

The USA distributor for this Southern Ice Porcelain clay is Seattle Pottery Supply in Seattle, Washington. Their website is www.SeattlePotterySupply.com.

They don't carry the paper clay version of this clay and have no plans to import it here to the US.
You already know how to make paper clay from a regular clay body from my earlier posts in this blog. S0, you are set!

Using Paper Clay Doesn't Mean Giving Up What You Know About Clay

One of the things I tell my new paper clay students is that what you learn about this clay just adds to what you already know about ceramics and clay.

It is not an either or situation. Your past experiences with a traditional clay can be transferred to paper clay. You just have to know what situation calls for the best technique.

Paper clay and its techniques can be a new and invaluable new tool in your "ceramic toolbox." Use what you know to achieve the result you are looking for.

As you can see in this picture, my works in progress are covered with plastic. I have several projects going on at the same time and it's easier for me to continue work on the paper clay while it's still in the wet or leather hard stage.

Thursday, February 16, 2012

Sometimes the Wheel Would Have Been Faster ...

I hand build all my sculptures, including the ones that may look like they have been done on the wheel. There is just something missing when I do any wheel work.

The preliminary stage of this piece I'm working on could have been done on the wheel. I was thinking about this as I was building up the sides. There is just something that I enjoy when I hand build, something moves within me, something reverent; paying homage to this lowly material that has taken millions of years to form and now I'm touching, feeling it.

Whenever I pinch out a ball of clay, I figured early potters must have done pretty much the same thing. How incredible it is that the basic material and technique have not changed in tens of thousands of years. Our two hands, our ten fingers and a lump of clay becoming fantastic creations, limited only by our imaginations.

The Sun Is Good For You ...

The sun is good for you. Our bodies need the sun to make Vitamin D which is essential to our health.

However, it's really good for your paper clay if you need to get it to firm up quickly. At full sun (especially in the hot Southern California summers), we receive about 100 watts of solar energy per square foot per hour. (1)

All clays can use the sun's solar power to firm up, but with paper clay, you don't have to worry about the clay going past leather hard. In fact, even if the paper clay is way, way dry for conventional (traditional) joining, it is not an issue. Paper clay with bond with itself with the correct joining techniques. With a traditional clay, once you go past this "leather hard joining window," you run into risk of your joints coming apart or the joints not even taking hold.

There are so many times I've said to myself, "Thank goodness I'm using paper clay for this project."

Using the sun's benefit is part of "forced drying". Here's the link to an earlier post of mine about this subject.


Reference:

Photo credit:
sheerwx.blogspot.com.

Tuesday, January 24, 2012

Paper Clay Masks, Part 1

These 3 masks were featured in the 500 Raku book by Lark Crafts. The construction method was described in an earlier post.

A clear Raku crackle glaze was used.

This is the link to my website with a little story behind them.

Available for purchase.

My Paper Clay Way of Making Masks

My preferred way of making masks is to make a bunch of these generic masks from a master mold, let them dry completely and then alter them. This way, I can store these bone dry "mask-forms" indefinitely until I get the inspiration or motivation to work on them. The picture on the right shows the plaster mold. Fresh paper clay mask are on the left.

Facial features can easily be changed, modified or even removed. At this point, I usually work by adding wet paper clay to the bone dry base, building up layer upon layer. If a jaw line needs to be drastically altered, I use a dry wall saw to effect such a major change. The bone dry form can also be wetted down to reconstitute the plasticity of moist paper clay so that contours can be reshaped.
I'm working on a new set of 3 Japanese masks. I'll post them soon.


Monday, January 2, 2012

Lighting Effects

The left image was my original concept for this piece. I wanted a beam of light shining down into the central aperture and illuminating the contents of the pod.

I took this picture with intentionally low light to illustrate the concept. In a well lit gallery, a much stronger light will be needed.

I think it's really nice to have the edges of the internal pods catch the light.


Past Lives Revisited, 2010
Paperclay, Black Mountain sculpture clay, Grogzilla high grog sculpture clay, Flashing slip on inside pods. Iron oxide on outside. No glaze. Cone 10 reduction. Central sphere is pit fired. 20”H x 13”W x 8”D

Monday, April 25, 2011

Ink & Clay 37 Online Gallery and Web Catalog

Here's the online gallery and web catalogue for this year's Ink and Clay 37. My piece, "Chrysalis" is in the show.

You can navigate through the gallery like you are there in person and view each artwork at your leisure. On the Mac, the Shift button zooms in and the Ctrl button zooms out. The web catalog is very professionally done.

Below is the link. Enjoy the tour.

Monday, March 28, 2011

"Chrysalis" Receives Award

Ink and Clay 37 at the Kellogg Gallery, Cal Poly Pomona.

This year's Ink and Clay 37 show features 103 artworks by 79 artists. 1o Juror's awards were given out, 5 for Ink and 5 for Clay.

My piece "Chrysalis" was one of 5 ceramic works that received the Juror's award at the opening reception last night. A cash prize of $500 was part of the award.

The juror for Clay is Kevin Wallace, Director and Curator of the Beatrice Wood Center for the Arts in Ojai, California.

When asked by what criteria he would determine his selections, Kevin responded: "Contemporary artists working in traditional craft media such as clay are often pushed in two directions: to improve their technical knowledge and skill and to create original work. Technique is of course important, but ultimately it only serves to further the artist's vision. As for originality, one need only look within. Each of us has a unique set of experiences, influences and desires. Artists are often advised to find a style that is highly original and search for something that will make an impression, often losing sight of their true individuality.

My criteria in selecting work will be that the work truly comes from within. Whatever the subject matter and techniques used, I will be looking for an honest approach to self-expression. I am not looking to be dazzled by techniques or overwhelmed by originality. I only ask that the work truly express and share the individuality of the artist."

The juror's statement resonated very strongly with me and I've included it here. I am happy to share "Chrysalis."

The show runs through Friday, April 29, 2011 at the Kellogg Art Gallery in Cal Poly Pomona, California. Here's the link to more gallery info (gallery hours, location, parking).

Wednesday, February 16, 2011

City of Brea 26th Annual Made in California Juried Exhibition

FOR IMMEDIATE RELEASE

Anthony Foo is pleased to present his new ceramic sculpture, COLONY, at this year’s City of Brea 26th Annual Made in California Juried Exhibition. This exhibition runs from March 26th thru May 6th, 2011 at the City of Brea Art Gallery, Brea Civic & Cultural Center, 1 Civic Center, Brea, CA 92821. Phone: (714) 671-3601.

Opening reception is on Saturday, March 26th from 7:00PM to 9:00PM. Admission is FREE.

Anthony Foo is an Orange County ceramic artist who has exhibited at the American Museum of Ceramic Art (AMOCA), Kellogg Art Gallery – Cal Poly Pomona, California State University Fullerton (CSUF) Grand Central Art Center, The McGroarty Art Center in Tujunga, City of Brea Art Gallery, Irvine Fine Arts Center and online Upstream People Gallery. He and his work have been written up in "Orange County Weekly," "Art to Art Palette" and "500 Raku" by Lark Crafts.

COLONY is the newest in my paper clay and wire mesh sculptures,” says Foo.

“This piece is made up of three subunits which can be arranged in various configurations, each giving a different feel and perspective. I like working this way as it allows the piece to be manipulated thus creating a "new" sculpture. Different people will arrange the work differently and this brings in the element of interactivity to the piece.

To arrange an interview with the artist, please call (714) 528-9304, or send an email to info@anthonyfoo.com, or visit the website at www.anthonyfoo.com.

Tuesday, June 8, 2010

American Ceramic Society Annual Show 2010

Two of my pieces "Made in America" and "Emergence" are going to be in this year's American Ceramic Society Annual Show at the McGroarty Arts Center in Tujunga, CA.

Opening reception: Saturday, June 12th from 5:00 - 9:00PM.

The exhibition will run June 14th thru 26th.
Gallery hours: Monday - Saturday, 10:00AM - 6:00PM

McGroarty Arts Center is located at 7570 McGroarty Terrace, Tujunga, CA 91042.

Made in America, 2009

Bmix and sand sculpture clay, paperclay, natural bamboo chopsticks, acrylic paint. High fire. Cone 10 reduction.

Oversized take-out boxes, fortune cookies and chopsticks.

Arrangement: 18"H x 21"W x 18"D

For the story behind this piece, click here for earlier post.


Emergence, 2009

Sculpture paperclay, flashing slip. Iron oxide and Manganese dioxide.

No glaze. High fire. Cone 10 reduction.

21”L x 11”H x 12”D

Monday, June 7, 2010

Yet Another Kitchen Tool Recruited!

This is the blender I used when I made my Black Mountain paper clay (see earlier post Part 1, Part 2 and Part 3 here). It was an old one that kind of worked intermittently. I was able to salvage it for use in my ceramic studio so I was happy to re-purpose it for another life.

As the immersion part of the blender is only so long, I had to blend in small portions. The blade works really good in chopping up the soaked paper packaging.

Since then, I've gotten a brand new one for the kitchen. Great for making strawberry smoothies.

Disclaimer: Use caution, wear gloves, and eye protection for your own safety when operating electric tools. Use at your own risk.

Paper Clay Workshop, June 19, 2010

I will be teaching a one-day hands-on paper clay workshop in June. Here are the details.

Date: Saturday, June 19, 2010.

Venue: My home studio in Placentia. Class size is limited to 8-10 students.

Time: 9 AM to 4PM. One-hour lunch break at noon.

Please contact me for more information at antjhfoo@gmail.com


Students will be able to view my sculptures up close in my home gallery. This will be a great opportunity for Q&A.

Anthony
www.anthonyfoo.com
http://antjhfoo.blogspot.com